
If you have been following this blog, you have watched the development of a zinc plate though polishing, beveling, line drawing etch, tonal or aquatint etch, spit bite aquatint, and using paint markers and grease pencils as acid resist.

You have seen a number of proofs of the image along the way, called “Stage Proofs” – proving the plate at different stages of development.

The final stage of development is working out the color wipe. The plate could be printed with black ink only, resulting in shades of grey, or inked in all one color, such as sienna, for a monochromatic image of shades of that color.
I print in a technique called “a la poupee” – a French term literally translating as “by the dolly”. It means dabbing and wiping different colors on different parts of the plate.

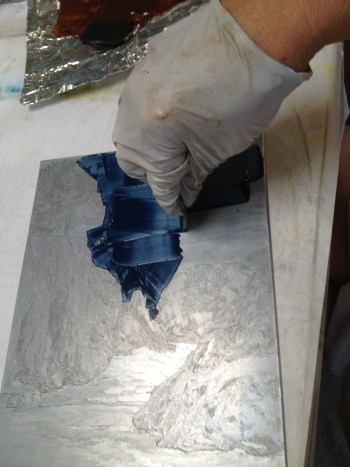
Many of my etchings are done this way, where colors are applied to sections of the plate and wiped separately, then the all of the colors printed at once on the etching press.

It is possible to wipe a base color and then apply another color over the top of it for a blended effect, and to bring color from one area of the image into another area. I do a combination of these for most of my color wipes.

On MacKerricher Beach, I started with two blues, one that was mostly Payne’s grey for the cloudy sky, and another for the waves coming through the gap. The rocks and cliffs were all wiped with sienna, and the trees and bushes with Cascade Green. The resulting print was nice but didn’t quite “pop” for me, so I remixed the colors a little, but more importantly, added a fifth color, a darker brown.

In this version, the foreground rock is wiped with a dark brown after the cliffs and the haystack rock are wiped with sienna. Some of the dark brown is wiped over the sienna at the base of the cliffs and blended into the sand.

A new green mix was applied to the tree, and the dirty rag from wiping the tree was used to dab a little green onto the haystack rock, the top of the cliff, and the side of the foreground rock. Then a clean rag wipe over all completes the color wipe.

This color combination is satisfying, and the placement of the layered green and brown is just what I was looking for. Now the challenge will be to make the overwipe layer areas similar from one print to the next.
Great attention to detail will be necessary to match the bon a tirer with subsequent wipes. While I don’t expect them to be identical, it will be possible to wipe too much – leaving the image t0o pale – or to dab the colors onto a larger or smaller area, creating a different look which may not be as satisfying. These prints are usually destroyed, although if it is interesting in it’s own right, just different from the edition, it may survive as an “artists proof”.
Your work is so fantastic. I love the two tones of green in the tree, with the shaded parts being darker. The standard rule is to mix in the opposite color for shade. So if using green, get the shadow by adding red to the green. But your tree leaf shadows look like they have blue in them. Did you avoid mixing in the opposite color rule for the shaded part of the tree? I like what you did and am curious as to why you did it that way. Thank you so much
Thank you for your comment. This work is an original print, in which there is a plate that is hand inked, wiped, and then printed on an etching press. While there are multiple colors on this print, they are broadly applied to distinct areas. MacKerricher Beach is inked with one blue/grey, one green and two shades of brown. The two tones of green in the tree are actually controlled entirely by the depth of the etch. I have only used one color of green ink on this plate. If you study the black and white proofs, you can see that the shadows are inherent in the etched plate and not by application of multiple shades of green. The pale green tones on the cliffs are a different story – those are the same green ink as the tree, however the green is applied over the top of the brown ink after it has been wiped. When this is gently wiped there is some mixing of the green with the brown beneath it. The resulting color is pale because the plate is not deeply etched in those areas. You might want to refer to an earlier blog about plate development to understand this better: http://artbyjulianne.com/blog/2013/07/31/how-tones-are-created-in-the-etching/
Thank you for your interest in my work and the comment. Let me know what other questions you have about my original prints or any of my other work!
Thank you so much!